The default installation of Ubuntu Server is non-graphical, the server is managed from the command line. Reasons for this type of installation are security and elimination of resource heavy GUI's (Graphical User Interface's). On some installations, the system management ease of a GUI makes life a little easier for the system administrator. It is possible to install the web based system management tool without the GUI. This method will allow you to use those tools locally on the server without using a separate computer on the network.
Tools to be installed are a lightweight window manager, a method of locking the screen, web based system management software, web browser and a light weight file manager.

Wednesday, October 22, 2008
Saturday, October 18, 2008
Shared Folders and Seamless Windows in Virtual Box
In this final installment of running Ubuntu Linux in Windows Vista with Virtual Box, I'll look at using shared folders and seamless windows. A directory in the Vista filesystem can be used to share files between the Vista host and Ubuntu guest operating systems. Seamless windows allows Ubuntu application windows to be used side-by-side with Vista application windows.
Shared Folders
First the folder to be shared must be created on the Vista host. Open a command prompt by clicking on Start -> All Programs -> Accessories -> Command Prompt. A directory can be created in the resulting location or at the top level of the C:\ drive with the following commands:
Shared Folders
First the folder to be shared must be created on the Vista host. Open a command prompt by clicking on Start -> All Programs -> Accessories -> Command Prompt. A directory can be created in the resulting location or at the top level of the C:\ drive with the following commands:
C:\users\kleyba> md \virtshare

C:\users\kleyba> exitInstalling Virtual Box Additions
Once Ubuntu is installed in a virtual machine, the Virtual Box Additions can be installed. From the Virtual Box User Manual:
To install the additions, Ubuntu must be started and logged in. From the Virtual Box menu, select Devices -> Guest Additions... The virtual CD-ROM for the guest additions will be mounted.

They (the Virtual Box additions) consist of device drivers and system applications for the guest operating system that optimize the guest for better performance and usability.Installing Additions
To install the additions, Ubuntu must be started and logged in. From the Virtual Box menu, select Devices -> Guest Additions... The virtual CD-ROM for the guest additions will be mounted.

Saturday, October 11, 2008
Open Terminal Here in Nautilus
I have a user that needed to navigate through Nautilus and open a terminal in the current directory. This behavior is not enabled by default. It turns out that Nautilus is scriptable, i.e. custom behaviors can be scripted. The G-script web page has several scripts that you can download to modify Nautilus. The specific script for the behavior we wanted was on the G-script web site, below is the code.
Using the gedit text editor, copy and save this shell script in a text file to your Nautilus script directory under ~/.gnome2/nautilus-scripts. Name the file something like openhere.sh.
#!/bin/sh

# From Chris Picton

# Replaces a Script by Martin Enlund

# Modified to work with spaces in path by Christophe Combelles


# This script either opens in the current directory,

# or in the selected directory


base="`echo $NAUTILUS_SCRIPT_CURRENT_URI | cut -d'/' -f3- | sed 's/%20/ /g'`"

if [ -z "$NAUTILUS_SCRIPT_SELECTED_FILE_PATHS" ]; then

dir="$base"

else

while [ ! -z "$1" -a ! -d "$base/$1" ]; do shift; done

dir="$base/$1"

fi


gnome-terminal --working-directory="$dir"
Using the gedit text editor, copy and save this shell script in a text file to your Nautilus script directory under ~/.gnome2/nautilus-scripts. Name the file something like openhere.sh.
Running Ubuntu on Vista with Virtual Box
I've been getting requests on how to dual boot Vista and Linux or requests to install Linux on someones recently purchased computer. If the goal is to try out Linux or a few of the many Linux distributions, then I suggest running Linux virtually. That way one can a) decide which distribution they prefer, and b) decide of Linux will be their primary operating system.
At work I prefer to use Ubuntu Linux as my primary operating system and run Windows XP in Virtual Box for specific tasks that must be run under Windows. At home, I run Vista as my primary operating system and run different instances of Linux for testing using Virtual Box. I also run instaces of Windows Server 2003 and Windows XP, only I found that Virtual PC works better for me in that specific testing scenario.
Installing Virtual Box on Vista
To start things off, Virtual Box needs to be installed. The install package can be downloaded from Virtual Box Website. The correct download is the Virtual Box for Windows hosts. I also suggest the Personal Use and Evaluation License (PUEL) version, for the additional features the Open Source Edition (OSE) does not include. Download the installer and then begin the installation by double clicking the downloaded installer package.
The first dialog box that appears is the Welcome screen, press the next button. The next dialog box is the End-User License Agreement. Select the "I accept..." radio button and click on the next button.

The Custom Setup dialog box allows the selection of USB and network drivers, select Next to accept the defaults. At the Ready to Install dialog box, click on the Install button to begin the installation. The installation begins at this point. Two resulting dialog boxes will ask to install the USB and networking drivers. Select Install to both of these dialog boxes.

The final dialog box indicates the completion of the installation, select Finish and this step is complete.
Creating the Virtual Machine
Start the Virtual Box application, the first step is to register your installation. After successful registration, the Virtual Box application window displays.

Click on the New icon in the upper left side of the application window to start the New Virtual Machine Wizard, at the welcome dialog click on Next.
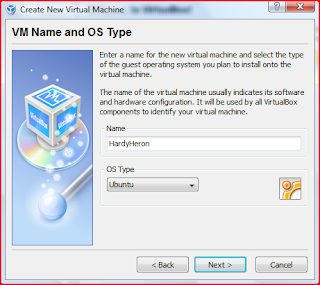
In the Name text window enter a name for your virtual machine and select the OS Type of Ubuntu. Press the Next button to advance to the Memory dialog box. Select a memory size by either moving the slider button or entering a number in the text box, then clicking the Next button. The amount of memory to use depends on the available memory on the host machine. If, for example, the host machine has 2 gigabytes of memory a good value to allocate to the virtual machine is 512 megabytes to 1 gigabyte. Another consideration is the way the virtual machine is going to be used. If the virtual machine will run without the host machine running any other applications, then the higher amount of memory allocated the better the performance of the virtual machine; leaving enough memory for the host machine to operate correctly.
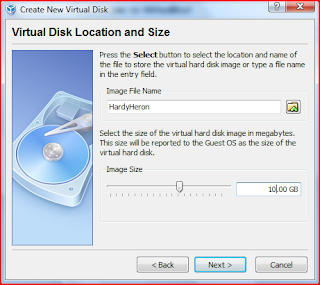
The next step is create a virtual hard drive for the virtual machine. In the Virtual Hard Disk dialog box, click on the New... button. Yet another Welcome dialog will appear for the wizard, click on the Next button. The image type dialog has two options for dynamically expanding or fixed size virtual disks. The former creates an image that will expand to the specified maximum as needed, while the latter creates a full fixed sized disk image. Selecting a dynamically expanding image is faster during setup and will save on disk space if the full image size in not needed. Leave the default of dynamic and click the Next button. In the next dialog box the size of the disk image is specified. The default of 8 gigabytes is adequate, but again depending on the available space on the host machine adjusting for less or more needs to be determined. Select the size of the image to be used, accept the default name and click the Next button. The wizards summary dialog appears, click on Finish to return to the Virtual Machine Wizard.

The newly created virtual disk image will be selected, click the Next button. The summary dialog appears, click on Finish to complete the virtual machine entry. The Ubuntu virtual machine is now listed in the left pane of the Virtual Box application. Before starting the Ubuntu installation an installation media source needs to be selected. There are two options for installation media, either an Ubuntu CD or mounting a downloaded ISO image from the Ubuntu web site. If the Ubuntu CD is used on the host machine, the CD is mapped or mounted to make it available to the virtual machine. An easier method is to download the Ubuntu ISO image that is normally burned to a CD for installation. Instead of burning an installation CD, the ISO image can be mounted and made available to the virtual machine.
 In the right side pane click on the blue CD/DVD-ROM text to bring up the settings window. From here either the host systems CD/DVD can be mapped to the virtual machine or a ISO image file can be mounted. In this example the ISO image file is used. Check the Mount CD/DVD Drive check box. Select the ISO Image File radio button and then click the folder icon to start the Virtual Disk Manager.

In the Virtual Disk Manager, click the Add icon and navigate and select the Ubuntu ISO image on your host machine, then click the Select button. The Ubuntu ISO image will now look like a mounted CD of the Ubuntu installation CD. The settings window can now be closed by clicking on the OK button. The virtual operating system is now ready to be installed.
A couple of notes; when the virtual machine is started the keyboard and mouse will be captured in the virtual machine. In order to switch back control of the keyboard and mouse to the host machine the host key needs to be pressed to release them. By default the host key is the right control (ctrl) key. In this example, Vista is running on a Mac Book Pro with Boot Camp and Vista. Since there is no right control key on the Mac Book Pro, I changed the settings under File -> Preferences -> Input, to change the host key to the left alt key. When starting the virutal machine, the host key is indicated in the lower right hand of the virtual machine window. Note that in the screen shots the alt key is indicated.
Installing Ubuntu
Now that all the preliminary steps are done, all that is left is the actual Ubuntu installation. To start the virtual machine, select the virtual machine in the left pane of the Virtual Box application and click on the green Start icon. The BIOS screen of the virtual machine is displayed and the F12 key can be pressed to select the boot device, by default the CD/DVD should boot. Two dialog boxes will display, one with information on the host key and another on the bit depth. Both can be safely ignored and the Do not show this message again check box can be checked and the window discarded by clicking the OK button. The Ubuntu installation CD is now booted and the first step is to select the install language, which is by default English, at this point press the Enter key. If the screen is left at this point, the default is to boot into a Live CD verson of Ubuntu, so pressing the Enter key should be done.

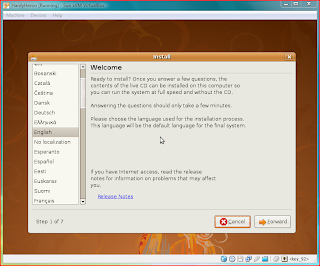
At the Ubuntu menu, down arrow to select the Install Ubuntu item and press enter. The installer begins and the first dialog box is the Welcome screen.
Click on the Forward button to get to the Where are you? dialog box, select the correct time zone and click Forward.

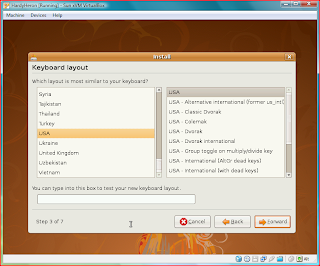
Next is the Keyboard Layout dialog where the keyboard type is selected, click on Forward.
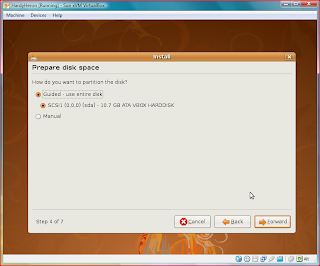
The next section asks for the disk layout, the Guided - use the entire disk default is used then click Forward.
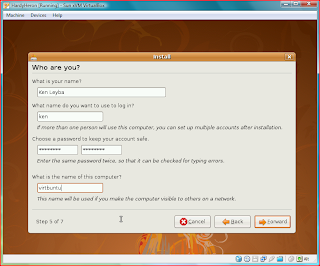
The Who are you? section is next, enter information in all fields, the log in name and password is critical to remember.
Click on Forward and the Ready to install window is now displaying with all the information previously selected and entered displayed. To begin the installation click on the Install button.

The Ubuntu installation magic now begins, grab a cup of tea or coffee and wait for the install to complete. After the virtual image is formatted, Ubuntu installed and configured the final Installation Complete dialog appears. Click on the Restart Now button to complete the installation.

The installation is now shutdown and the virtual machine displays the final screen indicating the CD media must be removed. From the Virtual Box menu, select Devices -> Unmount CD/DVD-ROM and then press the Enter key. Remember to return control to the host system to access the menu, the host key will need to be pressed first (e.g. Right ctrl).

The virtual machine will now restart booting Ubuntu for the first time. When Ubuntu has fully booted the login screen appears prompting for the username and password. After entering the username password combination the Ubuntu opeating system is now running in a virtual machine.

At work I prefer to use Ubuntu Linux as my primary operating system and run Windows XP in Virtual Box for specific tasks that must be run under Windows. At home, I run Vista as my primary operating system and run different instances of Linux for testing using Virtual Box. I also run instaces of Windows Server 2003 and Windows XP, only I found that Virtual PC works better for me in that specific testing scenario.
Installing Virtual Box on Vista
To start things off, Virtual Box needs to be installed. The install package can be downloaded from Virtual Box Website. The correct download is the Virtual Box for Windows hosts. I also suggest the Personal Use and Evaluation License (PUEL) version, for the additional features the Open Source Edition (OSE) does not include. Download the installer and then begin the installation by double clicking the downloaded installer package.
The first dialog box that appears is the Welcome screen, press the next button. The next dialog box is the End-User License Agreement. Select the "I accept..." radio button and click on the next button.

The Custom Setup dialog box allows the selection of USB and network drivers, select Next to accept the defaults. At the Ready to Install dialog box, click on the Install button to begin the installation. The installation begins at this point. Two resulting dialog boxes will ask to install the USB and networking drivers. Select Install to both of these dialog boxes.

The final dialog box indicates the completion of the installation, select Finish and this step is complete.
Creating the Virtual Machine
Start the Virtual Box application, the first step is to register your installation. After successful registration, the Virtual Box application window displays.

Click on the New icon in the upper left side of the application window to start the New Virtual Machine Wizard, at the welcome dialog click on Next.

In the Name text window enter a name for your virtual machine and select the OS Type of Ubuntu. Press the Next button to advance to the Memory dialog box. Select a memory size by either moving the slider button or entering a number in the text box, then clicking the Next button. The amount of memory to use depends on the available memory on the host machine. If, for example, the host machine has 2 gigabytes of memory a good value to allocate to the virtual machine is 512 megabytes to 1 gigabyte. Another consideration is the way the virtual machine is going to be used. If the virtual machine will run without the host machine running any other applications, then the higher amount of memory allocated the better the performance of the virtual machine; leaving enough memory for the host machine to operate correctly.

The next step is create a virtual hard drive for the virtual machine. In the Virtual Hard Disk dialog box, click on the New... button. Yet another Welcome dialog will appear for the wizard, click on the Next button. The image type dialog has two options for dynamically expanding or fixed size virtual disks. The former creates an image that will expand to the specified maximum as needed, while the latter creates a full fixed sized disk image. Selecting a dynamically expanding image is faster during setup and will save on disk space if the full image size in not needed. Leave the default of dynamic and click the Next button. In the next dialog box the size of the disk image is specified. The default of 8 gigabytes is adequate, but again depending on the available space on the host machine adjusting for less or more needs to be determined. Select the size of the image to be used, accept the default name and click the Next button. The wizards summary dialog appears, click on Finish to return to the Virtual Machine Wizard.

The newly created virtual disk image will be selected, click the Next button. The summary dialog appears, click on Finish to complete the virtual machine entry. The Ubuntu virtual machine is now listed in the left pane of the Virtual Box application. Before starting the Ubuntu installation an installation media source needs to be selected. There are two options for installation media, either an Ubuntu CD or mounting a downloaded ISO image from the Ubuntu web site. If the Ubuntu CD is used on the host machine, the CD is mapped or mounted to make it available to the virtual machine. An easier method is to download the Ubuntu ISO image that is normally burned to a CD for installation. Instead of burning an installation CD, the ISO image can be mounted and made available to the virtual machine.
 In the right side pane click on the blue CD/DVD-ROM text to bring up the settings window. From here either the host systems CD/DVD can be mapped to the virtual machine or a ISO image file can be mounted. In this example the ISO image file is used. Check the Mount CD/DVD Drive check box. Select the ISO Image File radio button and then click the folder icon to start the Virtual Disk Manager.
In the Virtual Disk Manager, click the Add icon and navigate and select the Ubuntu ISO image on your host machine, then click the Select button. The Ubuntu ISO image will now look like a mounted CD of the Ubuntu installation CD. The settings window can now be closed by clicking on the OK button. The virtual operating system is now ready to be installed.
A couple of notes; when the virtual machine is started the keyboard and mouse will be captured in the virtual machine. In order to switch back control of the keyboard and mouse to the host machine the host key needs to be pressed to release them. By default the host key is the right control (ctrl) key. In this example, Vista is running on a Mac Book Pro with Boot Camp and Vista. Since there is no right control key on the Mac Book Pro, I changed the settings under File -> Preferences -> Input, to change the host key to the left alt key. When starting the virutal machine, the host key is indicated in the lower right hand of the virtual machine window. Note that in the screen shots the alt key is indicated.
Installing Ubuntu
Now that all the preliminary steps are done, all that is left is the actual Ubuntu installation. To start the virtual machine, select the virtual machine in the left pane of the Virtual Box application and click on the green Start icon. The BIOS screen of the virtual machine is displayed and the F12 key can be pressed to select the boot device, by default the CD/DVD should boot. Two dialog boxes will display, one with information on the host key and another on the bit depth. Both can be safely ignored and the Do not show this message again check box can be checked and the window discarded by clicking the OK button. The Ubuntu installation CD is now booted and the first step is to select the install language, which is by default English, at this point press the Enter key. If the screen is left at this point, the default is to boot into a Live CD verson of Ubuntu, so pressing the Enter key should be done.

At the Ubuntu menu, down arrow to select the Install Ubuntu item and press enter. The installer begins and the first dialog box is the Welcome screen.

Click on the Forward button to get to the Where are you? dialog box, select the correct time zone and click Forward.

Next is the Keyboard Layout dialog where the keyboard type is selected, click on Forward.

The next section asks for the disk layout, the Guided - use the entire disk default is used then click Forward.

The Who are you? section is next, enter information in all fields, the log in name and password is critical to remember.

Click on Forward and the Ready to install window is now displaying with all the information previously selected and entered displayed. To begin the installation click on the Install button.

The Ubuntu installation magic now begins, grab a cup of tea or coffee and wait for the install to complete. After the virtual image is formatted, Ubuntu installed and configured the final Installation Complete dialog appears. Click on the Restart Now button to complete the installation.

The installation is now shutdown and the virtual machine displays the final screen indicating the CD media must be removed. From the Virtual Box menu, select Devices -> Unmount CD/DVD-ROM and then press the Enter key. Remember to return control to the host system to access the menu, the host key will need to be pressed first (e.g. Right ctrl).

The virtual machine will now restart booting Ubuntu for the first time. When Ubuntu has fully booted the login screen appears prompting for the username and password. After entering the username password combination the Ubuntu opeating system is now running in a virtual machine.

Friday, October 10, 2008
Welcome to the Small Box Blog
I created this blog for notes on Linux in smaller environments. Whether your own personal Linux box, workstation at work or administering a small Linux server, the goal is to help with tips, tricks and general information.
Enjoy,
Ken, The Small Box Administrator
Enjoy,
Ken, The Small Box Administrator
Subscribe to:
Posts (Atom)